# 20. 共享式集中數據管理
# Vuex 狀態管理
Vuex:https://vuex.vuejs.org/zh
Vuex 用來將資料集中管理,提供不同 component 去讀取。
# Vuex 的組成
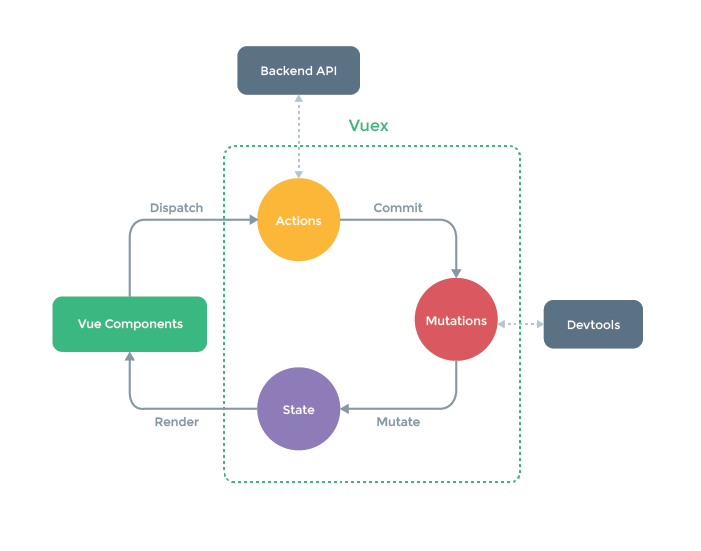
# Vuex 的單向資料流

# 三大重點
- Actions
- 主要處理 API 等非同步資料。
- 可以串接 Mutation、其他 Action 等
- 參數 context 可以用來看很多資料,但不能在這裡修改 state (要維護單向資料流的順序)
- Mutations
- 用來直接改動 State。
- 會影響到 Devtool,要改這裡 Devtool 才會變。
- Component 也可以直接 Commit Mutations。
- 除了 Mutations 之外,其他地方不可以改資料
- State
- 就像 component 的 data,是資料儲存的地方。
- 除了 State 之外,還有 getter 可以使用。
# Vuex 讀寫資料的流向

# 寫資料
- 後端 API 資料:
- Component > Actions > 讀取 API > Actions > 寫入 Mutations
- 改 store 資料:
- Component > commit > Mutations
# 讀資料
- 直接拿後端進來的資料:
- 讀取 State
- 將後端 API 資料進行修改:
- 透過 getter,有點類似 computed。
# 安裝 Vuex
https://vuex.vuejs.org/zh/installation.html#yarn
// CDN - 先引入 Vue 再引入 Vuex
<script src="/path/to/vue.js"></script>
<script src="/path/to/vuex.js"></script>

// npm
npm install vuex --save
# 檔案結構變化
安裝完成之後,專案資料夾中會有以下變化:
# 增加 store.js 檔案
增加 "store.js" 檔案,並有以下內容:
import Vue from 'vue'
import Vuex from 'vuex'

Vue.use(Vuex)

export default new Vuex.Store({
  state: {

  },
  mutations: {

  },
  actions: {

  }
})
裡面包含了 Vuex 的 State、Mutation 以及 Action。
# 修改 main.js 檔案
- 引入 "store.js" 檔案並掛載,跟 Vue-router 一樣。
import Vue from 'vue'
import App from './App.vue'
import router from './router'
import store from './store.js'

Vue.config.productionTip = false

new Vue({
  router,
  store,
  render: h => h(App)
}).$mount('#app')
# Component 操作資料
# 將資料集中到 store.js
以 "Iron.vue" 為例,將原本 data 中的資料移到 "Store.js" 的 state 裡面:
//- store.js

export default new Vuex.Store({
  state: {
    day: 0,
    header: {
      src: "https://vuejs.org/images/logo.svg",
      title: "Vue.js 手牽手,一起嗑光全家桶"
    },
    list: []
  },
  // 略
})
list 部分我們想模擬從後端 API 取資料的方式,因此:
- 在 public 資料夾中建立 "list.json" 檔案
- 將原本 "Iron.vue" 的 list 陣列資料搬到 "list.json" 中
- "store.js" 則先建立空陣列
list預備存放資料。

# 使用 computed 取得 state 中的資料
由於 "Iron.vue" 資料都被搬到 Vuex,因此需要重新取得這些資料到 component 才能將資料渲染到畫面。我們可以在 component 使用 computed 來取得 Vuex 中 state 的資料。
//- Iron.vue

  computed: {
    day(){
      return this.$store.state.day
    },
    header(){
      return this.$store.state.header
    },
    list(){
      return this.$store.state.list
    }
  },
目前 list 裡面是空的,因此需要在畫面加上判斷,
<div class="description" v-if="list.length">
再來,由於我們會改 day 的值,所以 day 的部分要加入 setter ,重寫如下:
//- Iron.vue

day: {
  get(){
    return this.$store.state.day
  },
  set(val){
    this.$sotre.state.day = val
  }
},
# 使用 dispatch 讀取 後端資料
我們要在 "Iron.vue" 的 mounted 階段使用 dispatch 讀取 list (仿 API 取資料),並傳入 day 的值,原本的 this.day = day 就不需要了。
//- Iron.vue

  mounted(){
    let day = parseInt(this.$route.params.day) - 1
    // this.day = day
    this.$store.dispatch("GETLIST", day)
    document.addEventListener("keyup", this.changeHandler)
  },
然後回到 "store.js" 設定 Actions 以取得 API 資料。
# 使用 commit 寫入 後端資料
Actions 可以串接 Mutation、其他 Action 等,是很重要的功能。其參數 context 可以用來看很多資料,但不能在這裡修改 state (要維護單向資料流的順序)。
//- store.js

  actions: {
    GETLIST(context, day){
      context.commit("SETDAY", day)
      return axios.get("/list.json").then(res => {
        context.commit("SETLIST", res.data)
      })
    }
  }
# 使用 Mutations 改資料
Actions 拿到的資料,要經過 Mutation 去修改、才能賦值到 State 裡面。以下示範接收到的後端資料,使用 commit 到 Mutation 寫入資料的方法。
//- store.js

  mutations: {
    SETDAY(state, day){
      state.day = day
    },
    SETLIST(state, list){
      state.list = list
    }
  }
因此,在 Vuex 中,從後端取得資料到存放資料的流向會是:
- Actions 的 GETLIST 方法
- 使用 axios 取得遠端資料
- 成功後用
context.commit("SETLIST", res.data)將結果丟到 Mutations 的 SETLIST 處理。
- Mutations 的 SETLIST 方法
- 用來將回傳結果寫入到 state 的 list
SETLIST(state,list){state.list = list}
- State 的 list
- 存放修改後的 list 資料,供 "Iron.vue" 用 computed 讀取使用。
# 不能在 Mutations 以外的地方改資料
在原本的 "Iron.vue" 裡面,我們有鍵盤事件,在不少地方都有改動資料。但使用 Vuex 會要求不能在 Mutations 以外的地方改資料,因此需要修改部分程式碼:
day的set使用commit寫資料- 按左右箭頭時,直接替換路由參數
day
//- Iron.vue

export default {
  computed: {
    day: {
      get(){
        return this.$store.state.day
      },
      set(val){
        // this.$sotre.state.day = val
        this.$store.commit("SETDAY", day)
      }
    },
    header(){
      return this.$store.state.header
    },
    list(){
      return this.$store.state.list
    }
  },
  methods: {
    changeHandler(e){
      let day = this.day
      if(e.keyCode === 37){
        day = day == 0 ? day : day - 1
      }else if(e.keyCode === 39) {
        day = day == 29 ? day : day + 1
      }
      // this.day = day
      this.$router.replace({
        params: {
          day: day + 1
        }
      })
    }
  },
  mounted(){
    let day = parseInt(this.$route.params.day) - 1
    // this.day = day
    this.$store.dispatch("GETLIST", day)
    document.addEventListener("keyup", this.changeHandler)
  },
  watch: {
    $route(){
      let day = parseInt(this.$route.params.day) - 1
      this.day = day
    }
  }
}
如此一來,事件觸發後的資料連動過程如下:
- 按左右箭頭的時候,會去調整路由參數
watch到路由改變後會去改dayday再去commit寫資料。
# 嚴格模式
在上面的例子裡,當資料集中到 Vuex ,透過 dispatch 讀取到 "Iron.vue" 檔案後,會發現路由以及箭頭的切換都無法跟 Vuex 裡面的資料連動。
透過參數 strict 開啟嚴格模式能幫我們找到問題,得知不能在 Mutations 以外的地方改資料。
嚴格模式的使用及建議如下:
- 在 store.js 的 state 上方加入
strict: true。 - 建議開發時開啟,產品上線關閉以免耗資源。
//- store.js

export default new Vuex.Store({
  strict: true,
  // state, mutaions ...等
})
← 19. 路由參數與監控 21. 模組化數據 →